This piece was originally written for the Tender Stores newsletter. If you would like to sign up for our occasional mailing list please
Tender started out with jeans. As a design process, a creative project, and as a brand, it’s moved outwards in many different directions, but jeans are still at the heart of what I do. One of the reasons that I’m drawn to jeans design is how many rules there are to work within, and how small the changes can be which completely change a garment. A case could be made for white shirts, black dresses, or tailored suits, but I think jeans are almost unique among clothes in how little any given brand’s design changes once a language has been developed. In the case of Tender jeans, with the exception of a minor pocket change after the first season there haven’t been any meaningful design changes in the past 16 years.
It may have been a long time coming, but in this piece I’d like to go through the design decisions that went into Tender jeans. I once read somewhere about bird books that drawings make better illustrations than photos, for identification purposes, as the writer can highlight the distinctions of a particular species and cut out the irrelevant bits. In this spirit, and because I’m traveling as I write this and don’t have a raw pair of Tender jeans with me to photograph, I’m going to attempt to illustrate this with sketches of the details I’m writing about. They may not be beautiful but I hope they make the designs clear. If you have your own Tender jeans, please follow along!
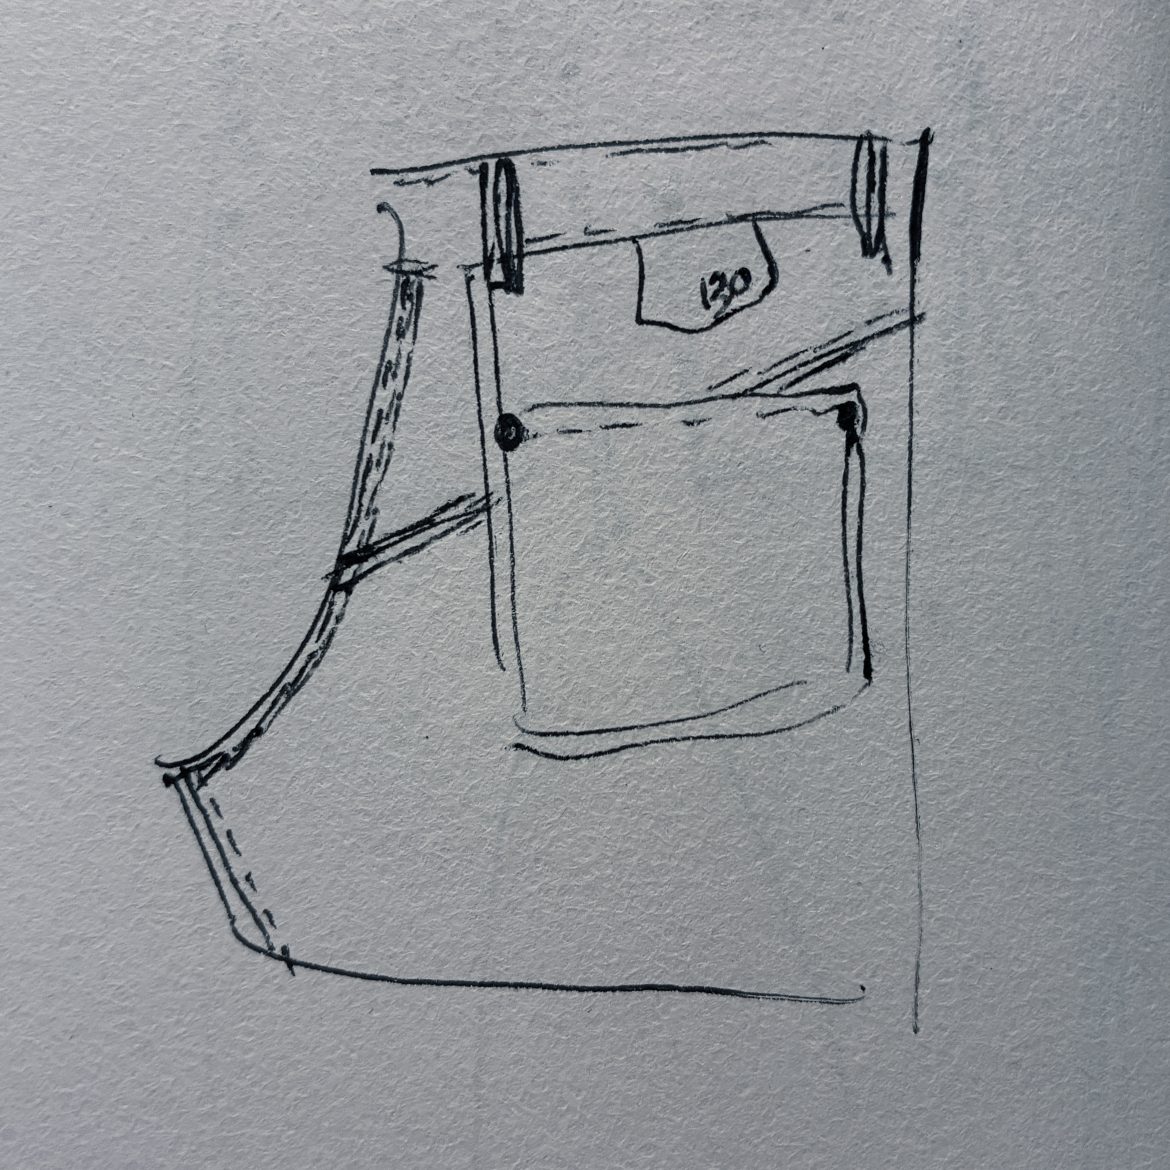
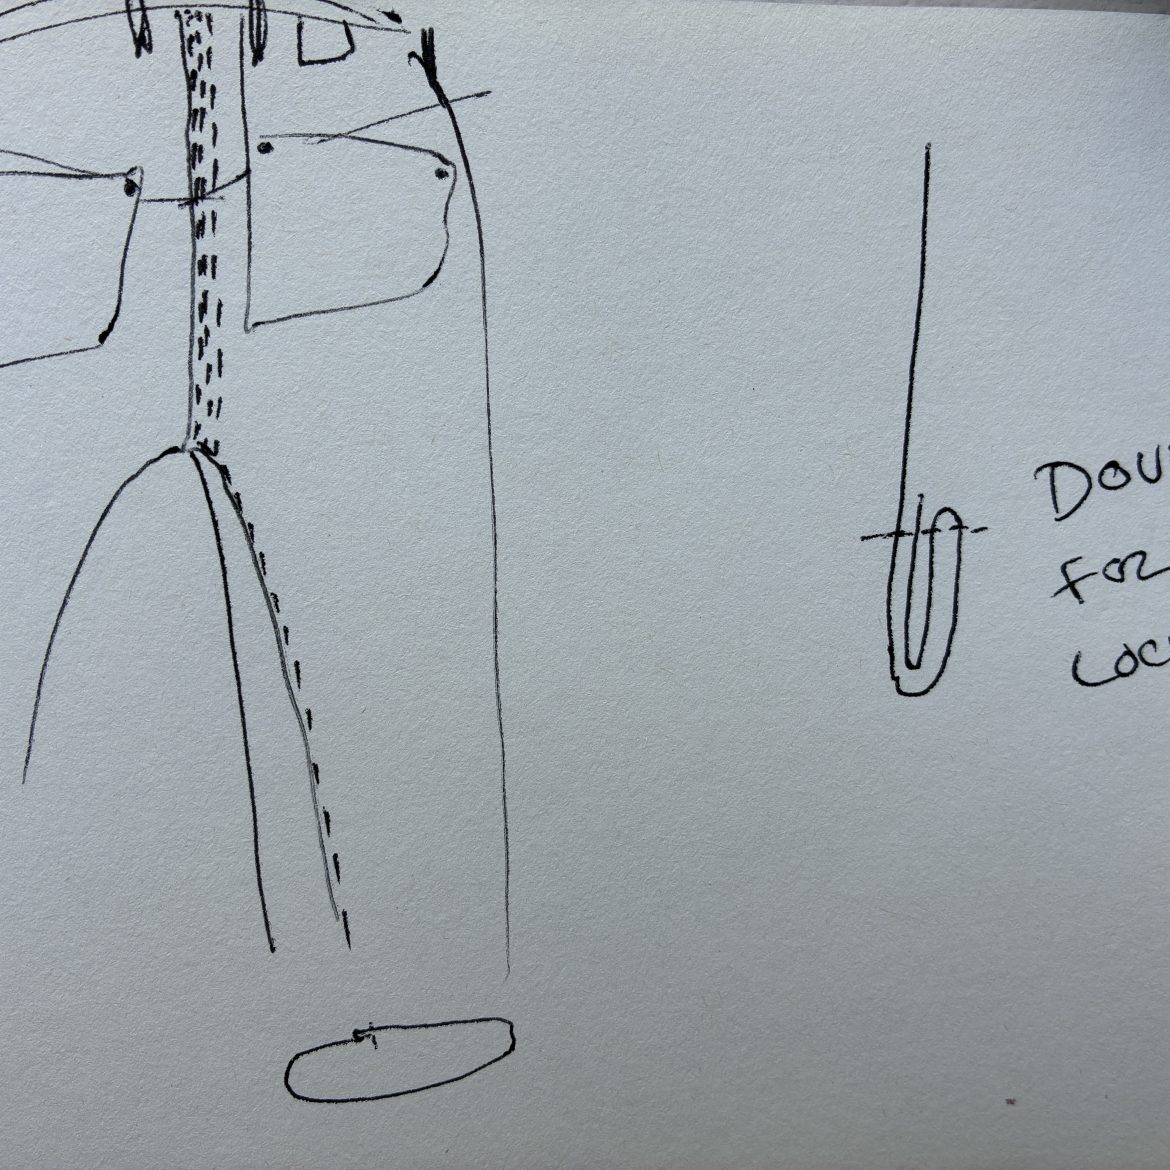
The waistband button of a pair of jeans is important in a way that other buttons on other garments aren’t. A lot of jeans have a branded top button, almost always a stamped metal cap over a hollow metal shank with a riveted pin or tack holding it to the garment. There are catalogues full of generic designs, and Japanese catalogues full of subtly reinterpreted historical designs. One of the big manufacturers will make a die and stamp custom button caps, but to get decent quality the minimum orders and set up costs are very high. At best, you end up with something that looks like a jeans button. This can be just right, especially if you’re looking to reproduce or evoke a historical garment, or if you’re going for something particularly subtle, or minimal. For Tender, though, I was intent on exploring as deep into each production process as I could, and bringing some sort of parallel-evolution, DIY way of working to my garments, so I didn’t want to hand over such an important part of my jeans to a faceless corporation.
I like removable buttons. In historical uniforms that I’ve had the chance to look at, buttons are often removable so that they can be personalize a standard garment for a particular company or office. For nurses’ uniforms I believe a reason to have removable buttons was so that the clothes could be boil washed without risk of damage, and for workwear, buttons were removed so that washed clothes could be squeezed through a mangle for drying, without crushing the buttons. This answered how a button could be attached (people like to rip at jeans top buttons, so sewn buttons aren’t always appropriate. The specifics took a bit more investigation. At first I wanted to make a one-piece button that somehow twisted into place, like a cufflink, or one of those Ikea worm screws, and I got to a prototype, but it was too bulky and didn’t work that well. The two standard ways of fixing a removable button are a split ring (like a keyring), a flat S shaped stay, and a cotter pin. At first glance a split ring seems most elegant, as it has no open ends and was used a lot on historical uniforms, however while it works fine on a jacket (which is fundamentally supported by the shoulders, and only keep closed by the buttons), in a pair of jeans it is tension on the button itself which holds the garment up (undo the top button and the jeans fall down). When a button attached with a split ring is put under tension, the split ring is pulled out at right angles to the fabric, ie right into the wearer’s belly. S stays and cotter pins, on the other hand, lie flat against the fabric. I found some nice S stays, but they were very fiddly to attach, and weren’t really large enough- I was a bit concerned that as the buttonhole that they were fitted through stretched out, the button might pull through altogether. Cotter pins, which seemed like the least appropriate, ended up being the best option. I found that if the pin is pushed over the button, and then bent in towards the fabric, the open end of the pin is pulled into the waistband of the jeans by the tension of being worn, which both stops the pin from becoming scratchy and also helps to lock the button orientation, so that it is less likely to rotate. I like the judo approach inherent in this. Originally I bought steel cotter pins, but eventually I found a source of brass cotter pins, which are softer, so that they can be bent into shape over the button, and will then settle into the fabric as the garment is worn.
The button itself is lost-wax cast brass, which is the exact opposite of die-pressing standard jeans button caps. The process itself is very time-consuming and highly skilled, and there are no meaningful economies of scale: making 1000 buttons takes a thousand times as long as making one button. This makes it impractical for large volumes, but for Tender jeans it means something uniquely achievable at small quantities, rather than a compromise on something that is designed to be made in large quantities.

As I said, a thing I like about jeans is all the rules, and how small changes can completely change the feel of a garment. For example, it’s been enormously exciting getting to use zips for Working garments- I’ve never let myself use a zip in Tender! The jeans fly had to be buttoned, partly because that was the historical period of workwear that I was drawn to, but mostly, again, because of wanting to understand, and have understandable, all the elements of Tender’s clothes. I understand the concept of a zip, but I’m frankly mystified that it actually works.
Traditionally, jeans have had four or five buttons, while overalls (worn over another full length garment) have less. I’ve seen three, two, or even single-button flies. I liked the idea of reducing the amount of buttons to be done up, while remaining socially acceptable. I tried a single button fly, and it was almost ok but on balance the space between the top button, the fly button, and the end of the fly was too great. Two fly buttons, on the other hand, are easy to do up and undo, reduce bulk in the fly, and in my experience are quite close enough together to keep everything hidden. The buttons I chose are unbranded Japanese reproductions of early 20th Century American jeans (if I remember correctly similar buttons were used on Neustadter Bros jeans, and also those marketed as The Stronghold). I toyed with the idea of cast brass fly buttons as well, but they’re too heavy, too bulky, and fly buttons are’t as talismanic as the top button, so seemed over the top. The fly is finished with a crotch rivet. These were removed from Levi’s, I believe, after Walter Haas, the boss, squatted in front of a camp fire and experienced the heat-conducting properties of copper. As with many Levi’s stories, this may be apocryphal, but it all adds to the richness of jeans lore. Even though a crotch rivet isn’t as important as pocket rivets, I think the added metal balances out the front of the garment giving a counterpoint to the detail that gets crowded at waist-level.
‘Five pocket jeans’ are the expected standard, and they just have a very nice visual balance, as well as having evolved practically. There’s a good case to be made that the fifth pocket is an evolutionary dead-end, but then jeans aren’t all about practicality.The first pair of pockets are the front, or side pockets, depending on how you think of them.
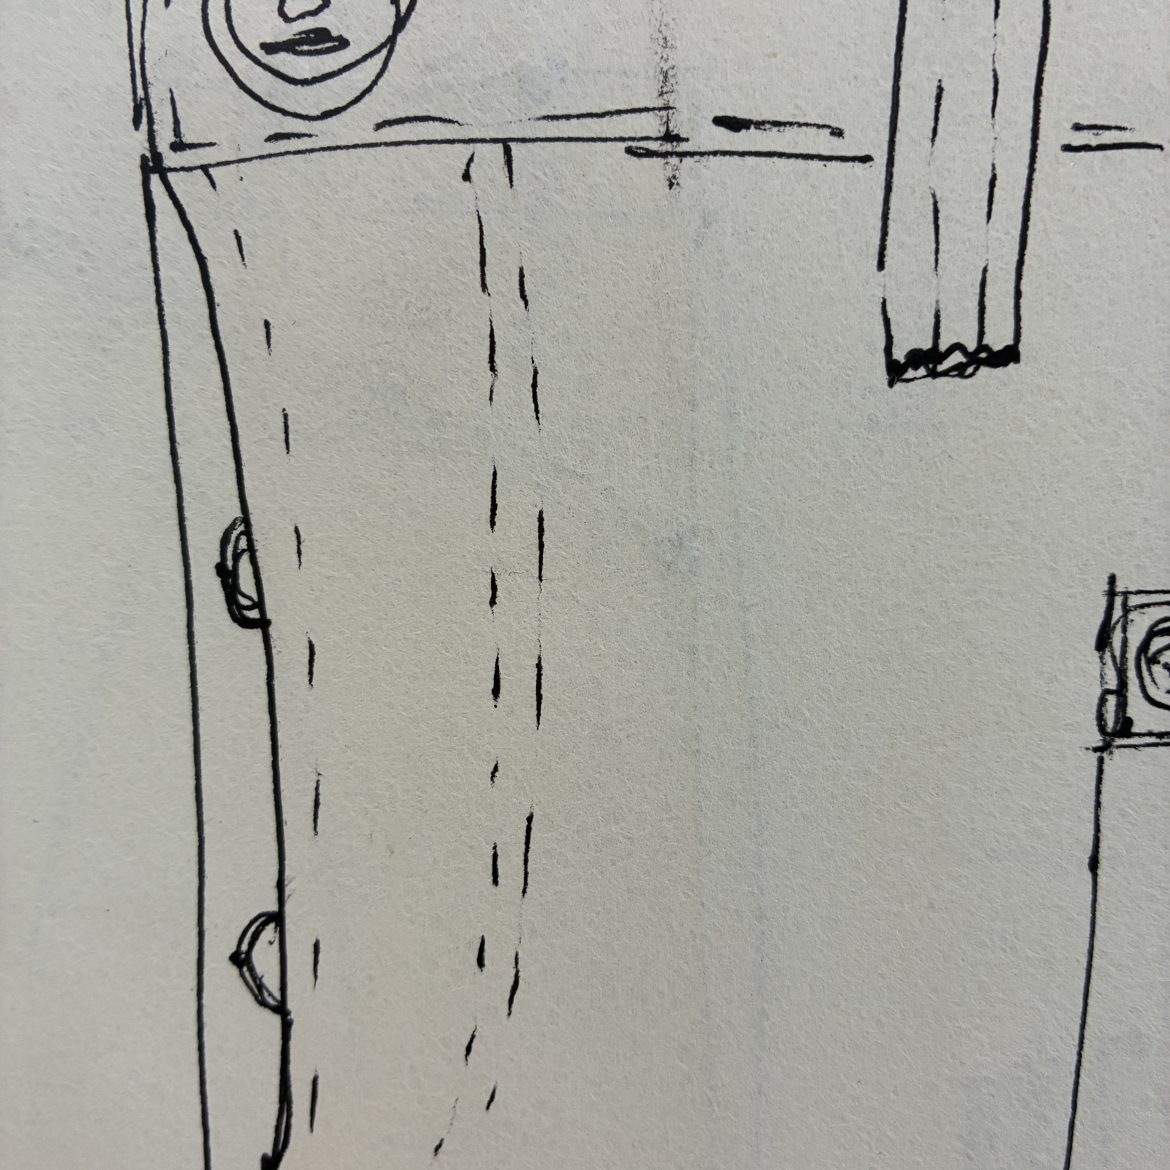
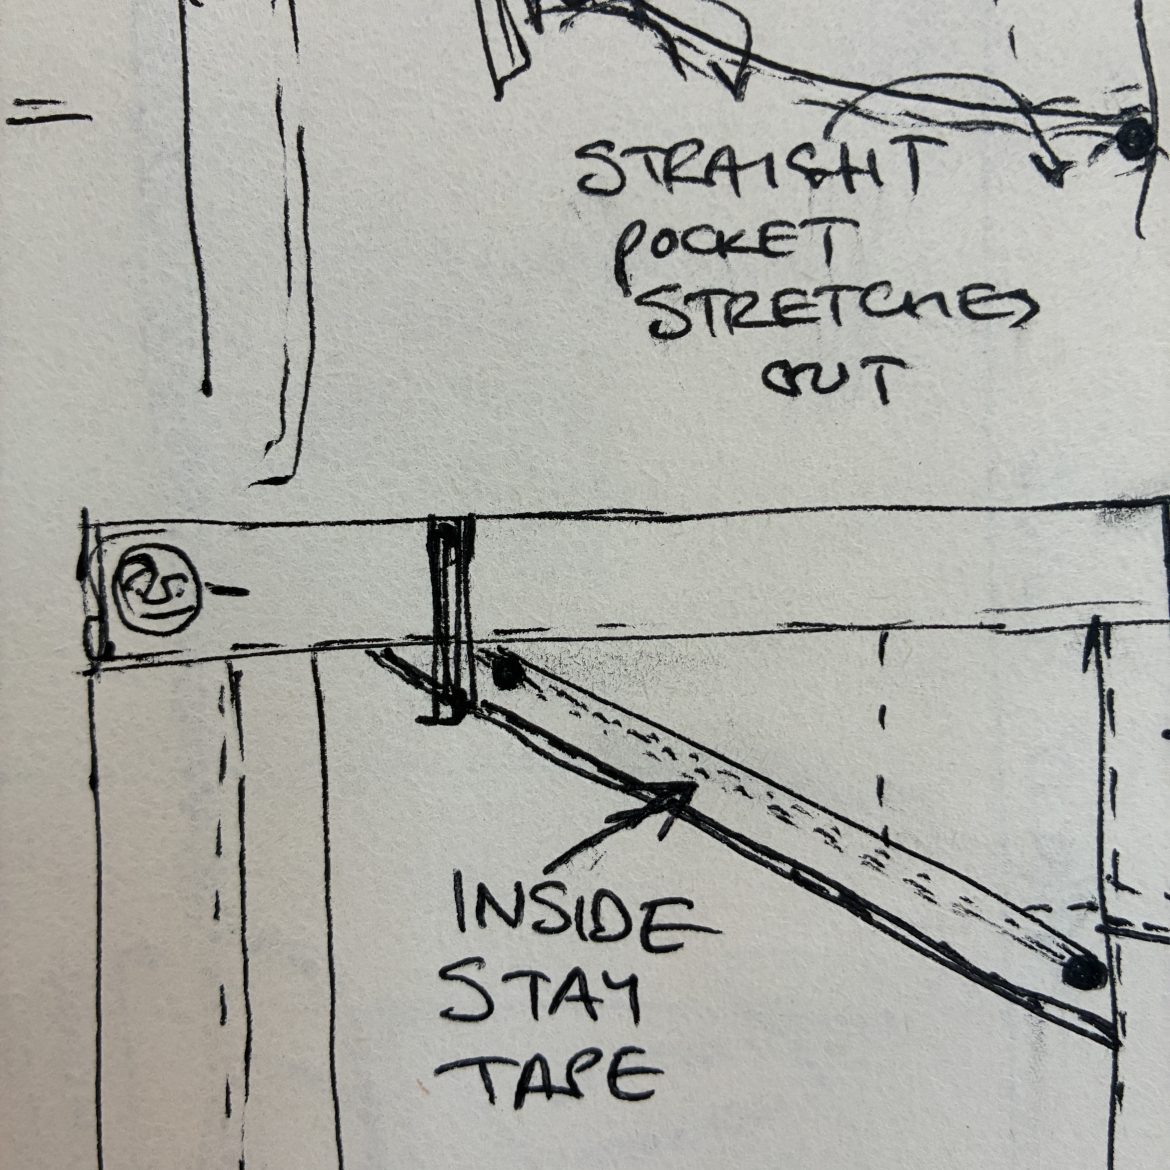
From a construction point of view, they’re front pockets, as they are attached to the front panels before making up. (As an aside, unlike tailored trousers which are constructed as two legs, sewn together at the middle, jeans are constructed as a front and a back, sewn together along the inside and outside leg seams). The classic front pocket shape is called a scoop, and it’s a more or less flattened quarter circle with its theoretical centre at the top of the outside leg seam. This curve gives reasonably easy access, from above- meaning that the contents are less likely to fall out when riding a horse or stumbling up boulders in the desert, and sits flat against the garment, without gaping open. Considering front pockets got me thinking about how they are when new versus how the will be when worn in. In my experience, round-opening front pockets can be tight to reach into, and over time the stitching around the pocket mouth tends to break. I think this is because sticking your hands into the pockets from above stretches the pockets out, but because the opening is curved there’s no fabric to stretch, and the sewing lines break, instead.
Pulling diagonally across a piece of fabric will stretch considerably more than pulling up or across the fabric. This is because pulling up and down or side to side, you’re pulling the warp and weft yarns, which (unless they’re artificially stretchy) are pretty stable. When you pull diagonally across fabric you cause the warp and weft to slide against each other, distorting the weaving pattern, which is held together by friction but isn’t as rigid as the yarns themselves. The diagonal of fabric is known as the bias, and bias cutting (cutting a pattern that would normally be square, at an angle across the fabric, so that it behaves differently), is an art in itself. However on a much simpler level, if you cut a diagonal pocket edge, it will stretch much more easily than a square or rounded pocket. I have an old pair of overalls which have straight, diagonal front pockets, which stretched out nicely, but again the edge stitching broke.
When I was learning tailoring, as a coat making apprentice over a year and two summers taken out of college, one of the jobs I was eventually let loose on was putting together certain elements of waistcoats. The opening of a waistcoat, unlike that of a tailored jacket, is an open diagonal cut. This is almost always true, even when a waistcoat appears to have lapels, they are usually decorative, sewn into the shoulder seam, and thus not providing any structure. Tailoring is all about fitting cloth to the shape of the body, and providing whatever hidden scaffolding is necessary to keep it in control. In the case of waistcoat fronts, the diagonal (bias) opening would be liable to stretch and gape, so the edge is supported with a stay tape, sewn into the front seam. A stay tape is simply a strip of straight cut fabric which is put on short, which is to say that it is cut a little shorter than the length of the vest opening, and stretched to fit, at the sewing machine. This tension between the pulled stay tape and the potentially gaping bias cut front, if balanced correctly, keeps the front of the vest flat to the body and disinclined to stretch out over the life of the garment.
For my front pockets, then, I cut the pattern at a shallow angle, in the expectation that they would stretch out to become a 3-dimensional, easy to use, opening, but I wanted some firmness inside the pocket mouth so the sewing threads wouldn’t break and allow the pocket to come apart. Inside the diagonal pocket edge seam is a separate straight strip (cut on the selvage) of denim, which holds the edge back. You can see the selvage line behind the pocket bag, if you lift it up.
The pocket bag itself is made out of the same denim as the rest of the garment. This means that there’s no need for a separate facing panel, and the pockets will last as long as the rest of the garment. I always find that pocket bags are the first thing to go, and one of the hardest to repair, and this solves the problem. The pocket panels are cut on the selvage too, for what that’s worth, and you can see the selvage line right at the bottom of the inside of the pocket, if you turn them out.
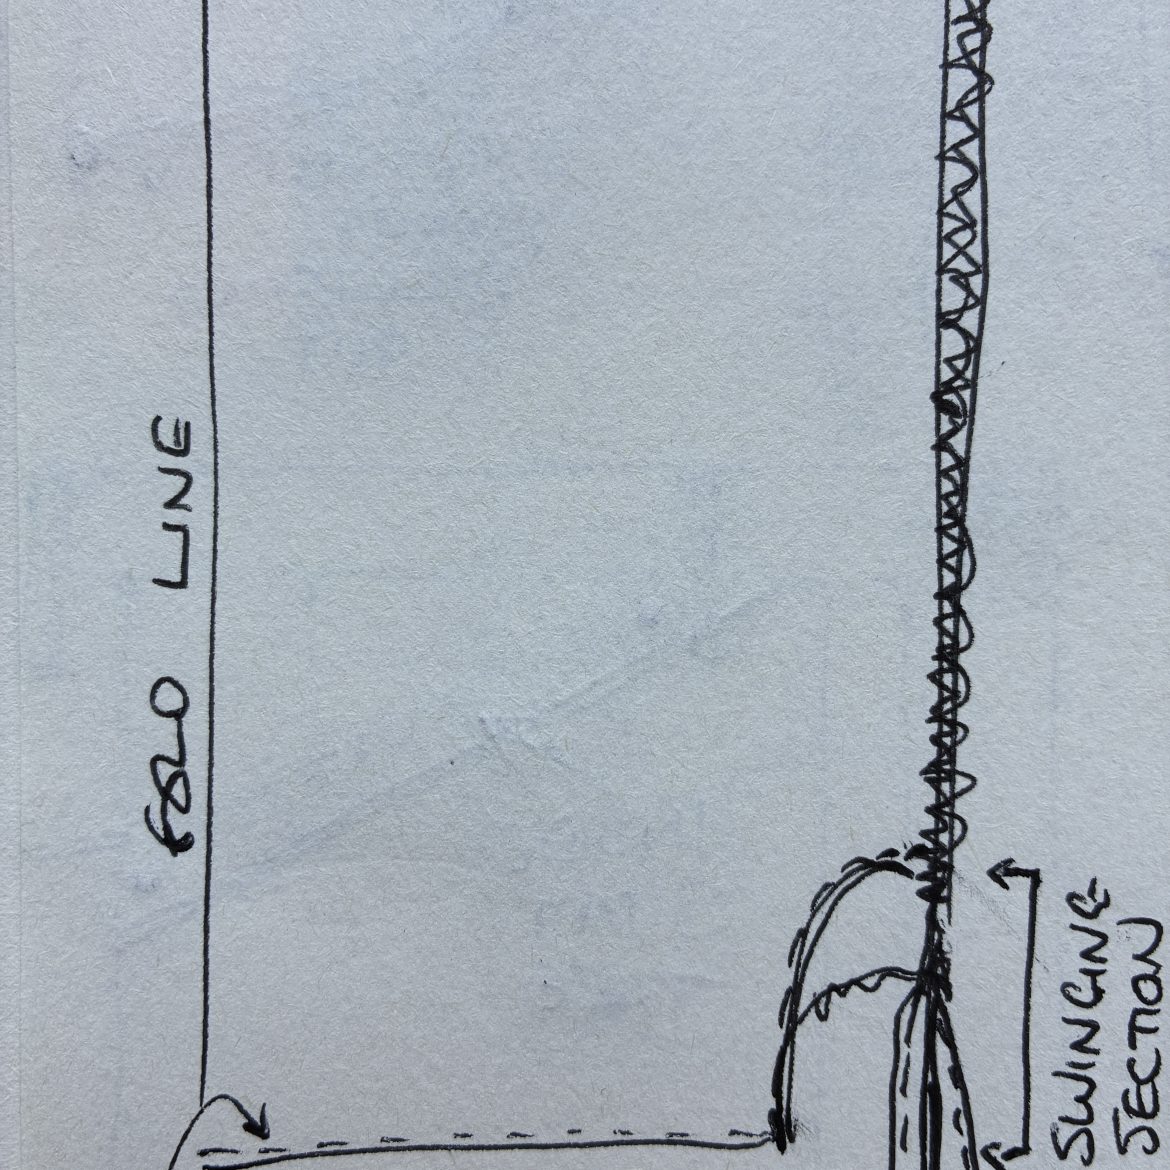
Finally on side pocket bags, the shape of the pocket bag itself is worth considering. A front patch pocket can be a very nice thing, but it has the disadvantage that the contents fall out relatively easily, especially when sitting. Pocket bags deal with this problem by being separated from the front panel of the jeans, so that the bottom section of the pocket can twist or hang away from the front, keeping the contents out of line with the open top. The shape of the lower back corner of the pocket bag controls just how much this happens. A pocket back that runs square along the bottom into the side seam is barely different from a patch pocket. A concave rounded pocket has the advantage the coins or small contents will roll down to the front of the pocket, but my preference is for a convex pocket corner, which frees the whole lower section of the pocket from the side seam, giving the largest possible hanging section.
The second pair of pockets, at the back also have various factors to take into account. Firstly the shape of the pockets, which can also be symbolic (Levi’s spade pocket, Lee’s shield). Both of these pockets have the advantage that the corners are angled inwards, so that the folded inlays don’t stick out, and there are no exposed lower corners to wear through, however the shield feels a bit fussy, and both of them are often a little small, as the pocket tapers from a top which is governed by the space available on the back panels. Stylistically, a square felt right for Tender, and I simply cut out a piece of pattern paper that looked about right and held it up to the pattern for the backs. It’s been the same since. The pockets are lined with lighter weight calico. Unlike front pockets, back pocket lining isn’t really structural, but it softens the pocket a little, and gives it a feeling of substance. It’s also nice to have a piece of ecru cloth somewhere on the garment to get a good view of whatever dye the jeans may have been colored with.
Rivets across all parts of Tender jeans are copper dome rivets, similar to those used by Wrangler: I find these the most convincing response to the scratched seats problem. Apparently, when children started coming to school wearing jeans, teachers would complain that the pointed pin-and-washer rivets on their back pockets would scratch the school chairs. Levi’s responded with an overengineered (in my humble opinion!) hidden rivet, which if not perfectly set significantly weakens the garment. Lee switched the back pocket rivets for bartacks, which is very neat but changes the language of the garment and introduces another feature, where I like the purity of a single choice working all over. Wrangler used a round capped rivet instead, for all their pocket corners.
Also borrowed from Wrangler, the back yoke seam points down, where most jeans yokes point up. By this I mean that the seam is constructed so that the yoke panel is on a plane above the leg panel, and if you brush your hand up and down over the seam it catches on the upstroke. I have been told that the reason for Wrangler’s choice was that if a wallet slid up out of the back pocket, while in the saddle, the wallet would catch on the yoke seam and not work its way fully out. I took this one step further and moved the yoke panel down so that the pocket top covers the seam, adding to the efficacy of the yoke seam safeguard. Another reason to lower the yoke is that it helps push shape to the centre of the seat, where it is needed, rather than adding shape above the seat, in the position of a standard yoke seam, where it is not.
Back pockets are sewn on with a single long stitch that runs off under the waistband. This (echoed in the way that the size label is sewn to the left front pocket bag) is a nod to early sewing machines, which didn’t have a reverse function. Rather than ending a stitch with a backtack, which secures it from coming open, it was standard practice to run a stitch off the edge of the fabric at a place where another seam would cover the open end, so stopping it from coming undone. The two back pockets are sewn from the left edges, which makes the back pockets and stitch lines look a little like a 66.
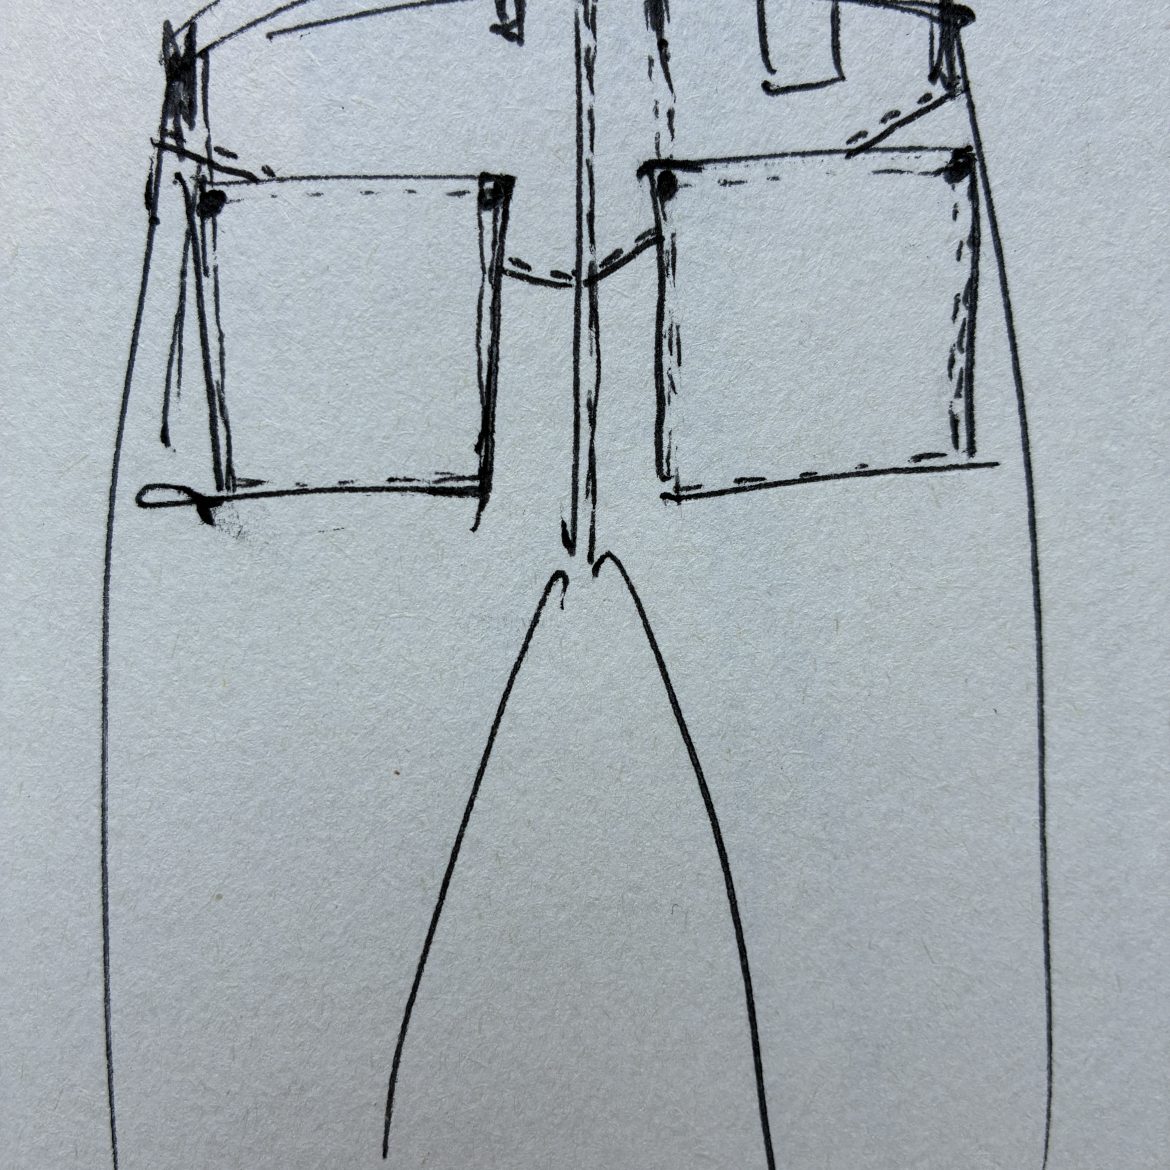
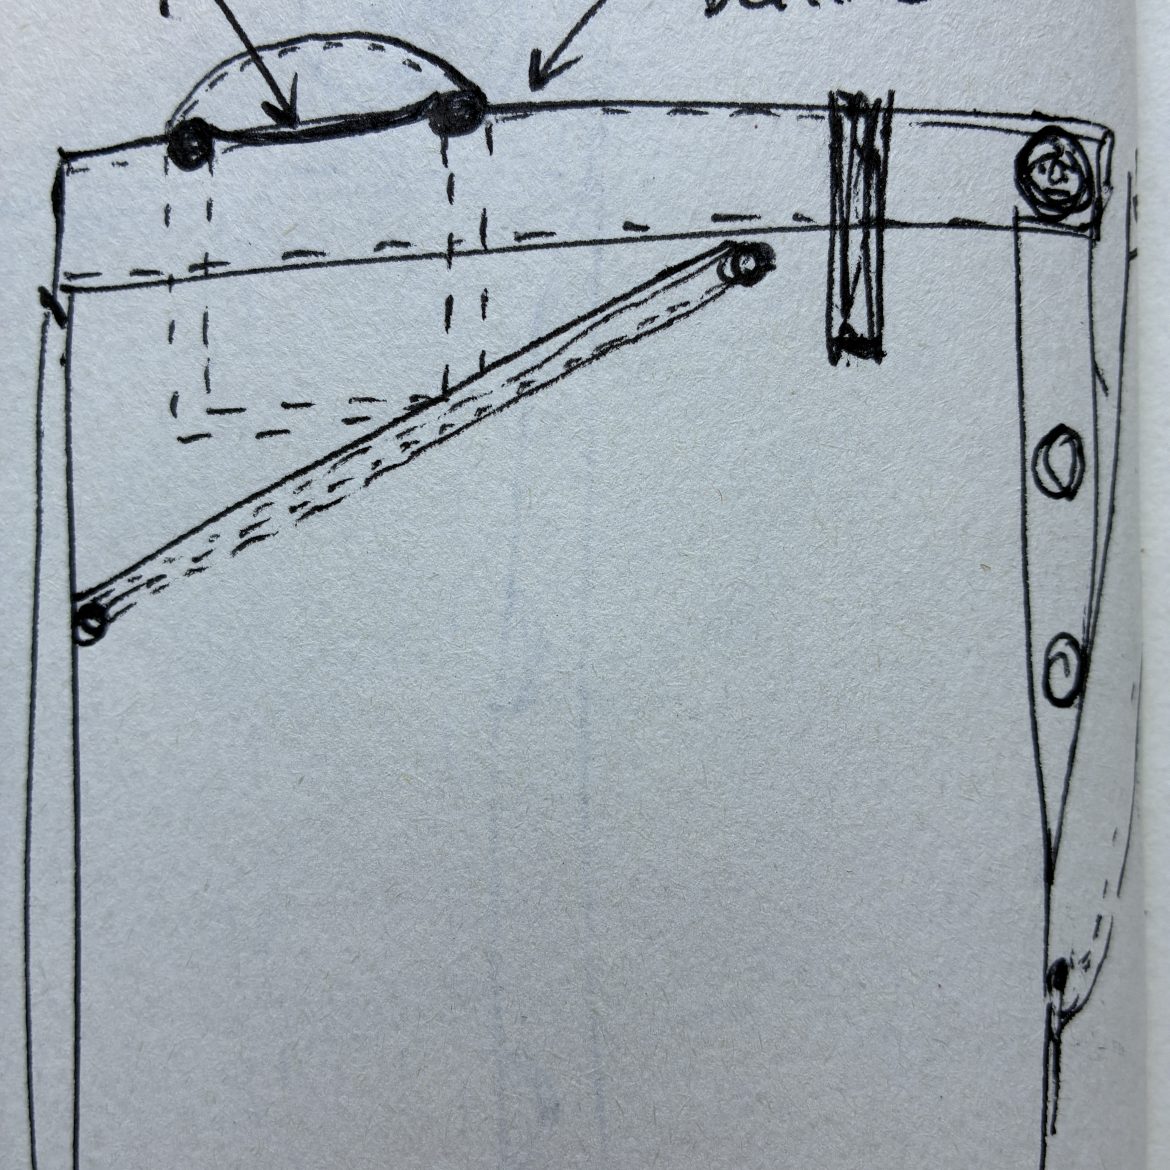
The fifth pocket is the one that gets least use, and can bring the most character, to a pair of jeans. Levi’s called theirs a match pocket, evoking the rough life of a prospector. Lee’s is a watch pocket, for the rather fancier industrial foreman. Wrangler has a coin pocket, for a less well-off ranch hand. The shapes and names of these pockets differ, but they’re all smaller additions into the right front pocket facing, below the waistband. The fifth pocket on a pair of Tender jeans is called a snob’s thumb pocket. It is sewn behind the waistband and front pocket, so is one of the last operations to be carried out. By having it behind the waistband, it can be accessed even when wearing a belt, and sits slightly higher, so is a little more easily accessible. The curved lined facing that sticks up above the waistband makes it easier to locate by touch. This style of pocket is not my invention, although I’ve never seen it on jeans. I was shown it by a Court tailor (someone who specializes in highly ceremonial clothing for British pageantry) on a pair of silk velvet knee breeches.
The only pockets on the garment were a pair of bags sewn inside the front waistband, one on each side, with rounded facings sticking up. Why they’re called snob’s thumb pockets isn’t entirely clear to me, but I suppose one could stick ones thumbs into them, thrust ones chest out, and snob around like a peacock in silk knee breeches. I have also been told that these were watch pockets, and that a gentleman would carry two, partly out of affectation (see double-wristing) and partly because pocket watches were so inaccurate that two were needed to be sure of the time.
The snob’s thumb pocket is riveted from the inside out, so that the flat back of the rivet (with UNIVERSAL branding, again a Japanese reproduction of early American rivets) is visible outside the jeans, or doesn’t stick out and risk scratching a belt. The rounded dome rivets aren’t uncomfortable from the inside, either.
The first couple of runs of 132 jeans didn’t have a snob’s thumb pocket. At that point I was thinking more of them as being engineer’s jeans, and I wanted to include a pencil pocket. Rather than a rivet on the right front pocket corner, a bartack was set half an inch away from the side seam, and a single stitch line compartmentalized a narrow pocket for a pencil. Specifically a pencil, in appreciation of the anecdote that the US space mission spent millions of dollars on a pressurized pen that would write in zero gravity, while the Russians took pencils.
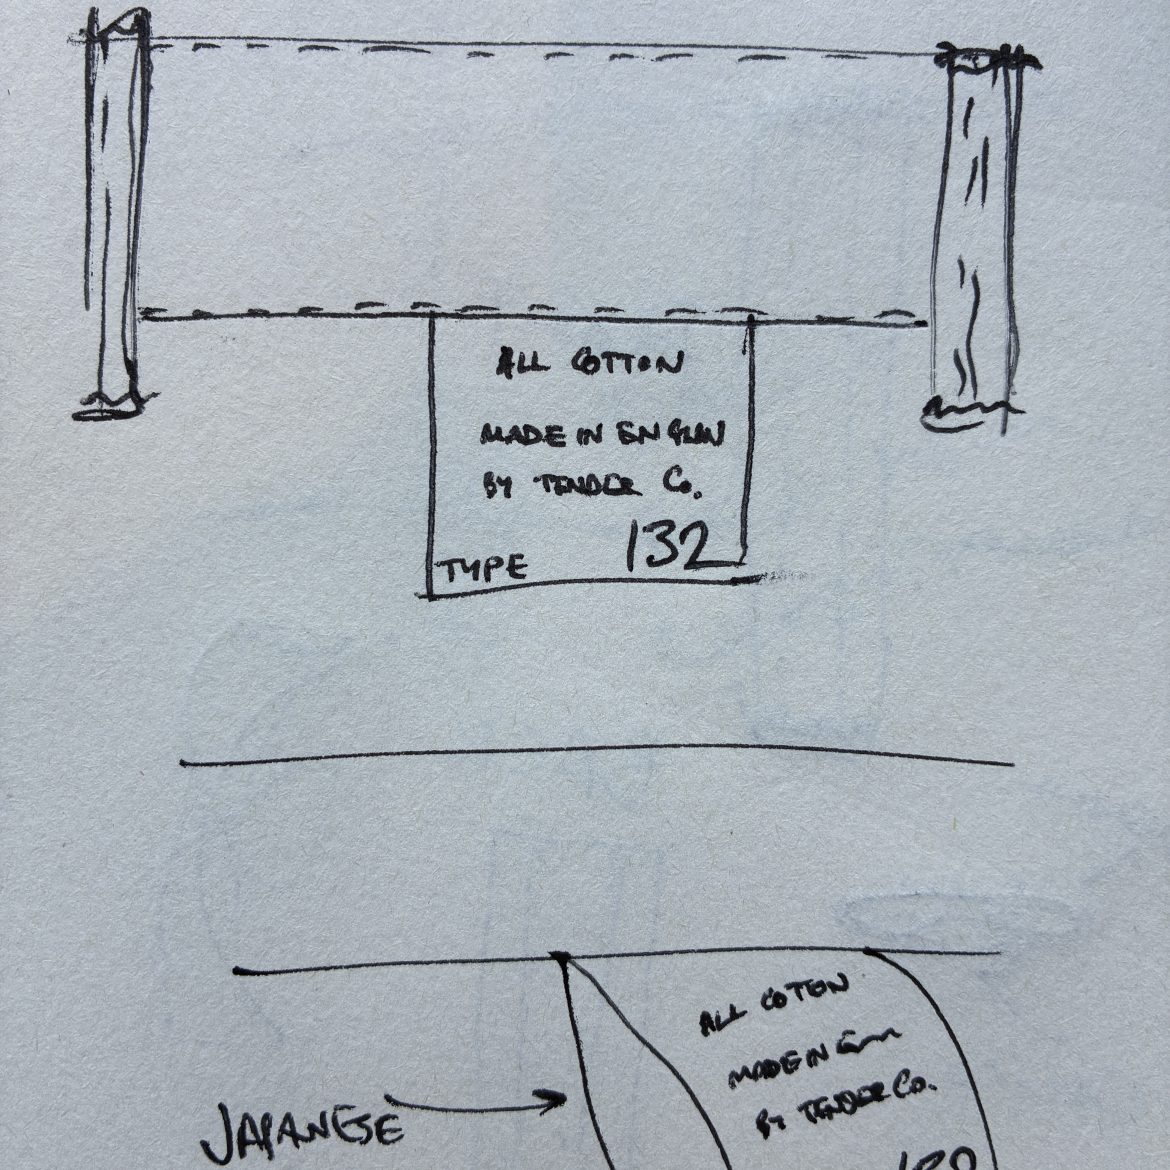
The first pair of Tender jeans evolved from genuinely, innocently, home-made jeans, with which I started the home-made jeans thread on superfuture (still going, 18 years on!). I sewed a patch onto the back with the date and my then-home address, which was house number 132. Jeans, as stock goods in hardware stores, were given numbered stock codes (most famously 501), and I think it’s no coincidence that collectible, obsession-worthy things often have recognizable serial numbers of some sort (watches, cigarette cards, first editions). There’s also something romantic about the fungible becoming non-fungible through ownership- jeans that are intentionally the same as every other become unique to their owner by the time they spend together.
Anyway, the first style was numbered 132, and subsequent jeans have strolled up and down the street, starting with the next door neighbors at 130, and since as low as 122 and as high as 156, not including trousers and shorts. Jeans are usually stored folded front to front, then in half at the knee line, and again around the crotch, until the item to sit on a shelf is more or less square, with the flat right back pocket and waistband on display. To quickly identify otherwise very similar stock, brand, style number, and size are often displayed somewhere within this space. A leather or paper patch on the waistband could give all this information, as could a tear-off paper ticket sewn under the waistband. Temporary paper ‘flashers’ stitched or stapled onto the back right pocket added room for more storytelling, and colored tabs sewn under the right back pocket, or onto the yoke line, combined stock identity with longer-lasting branding. In more recent stock-keeping, the long stickers showing size that you find running from the thigh to the knee on jeans in supermarkets fulfills the same function but doesn’t require such neat folding- as long as the fold lies somewhere along the line of the sticker, the garment’s size will be visible from the edge on a stacked shelf.
People like to have washing instructions on their clothes, and retailers expect it, so rather than hiding a care label inside I decided to use it as the only exterior branding (apart from the waistband button). A little personal touch, in juxtaposition with the Gill Sans (extremely problematic as he was personally, I’m a fan of his work) black print on a white acetate label, I write the Type number of each garment onto the care label by hand. I use a Stabilo fine tip permanent marker, which I find works the best, and has a very slight brush tip, which gives the numbers a little extra character. The tab is marked on the reverse “this tab may be removed”. In my experience if you add a decorative piece of branding, people will want to remove it, but if there’s an unintentional functional label attached to a workwear garment, people want to keep it. The handwritten type number is also an echo of the prices or internal stocktake counts that you sometimes find on deadstock clothing tabs- another thing that I’m fond of.
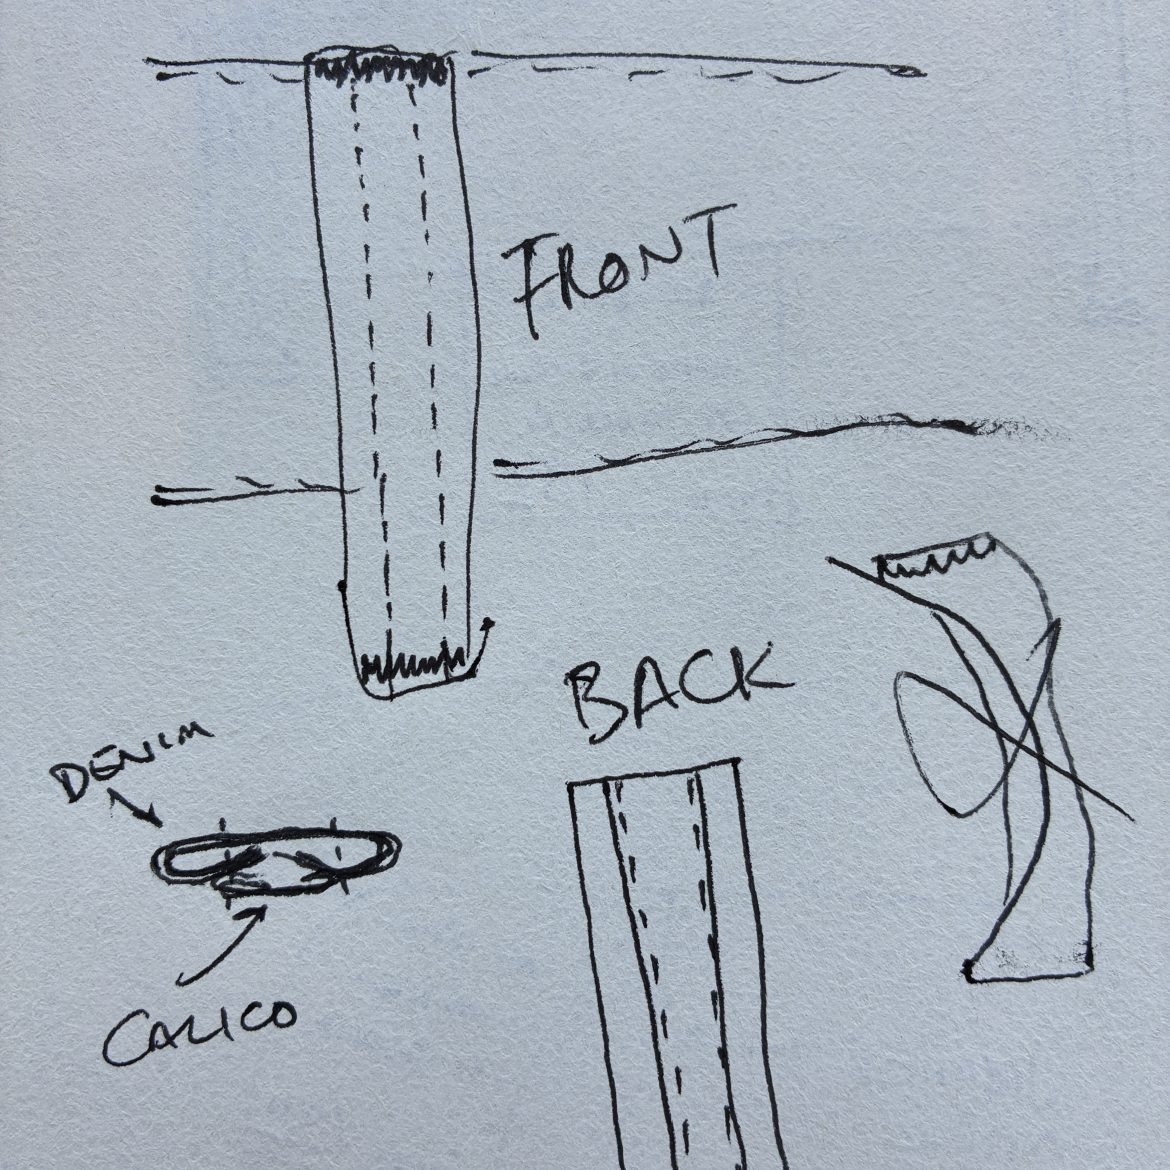
Belt loops are another detail that I think bears more consideration than they often receive. Most jeans belt loops are made on a specific machine, which takes long strips of fabric through a folder and creates a twin straight stitch along the front side and a zigzag cover stitch on the back. Some machines are nicer than others, and in my opinion the best form a generous ridge down the centre of the loop, which will fade at a higher rate than the sides, as well as adding a certain amount of strength. Much as I admire those who devote themselves to machine renovation and maintenance, however, Tender is not that brand.
Following the DIY approach I brought up when describing button choices, the six belt loops are individually constructed and lined with calico on the backs. This is a more work per belt loop, but means not having to acquire a perfect belt loop machine, or compromise with a standard loop. Building the belt loops like this gives them a nice substance, and the little flash of ecru or dyed calico behind each loop adds another subtle idiosyncrasy.
Most of the construction details are at the top of the jeans (although some would say that most of the interest lies in the open areas of the denim itself), however there are still a couple of decisions to make below pocket level. The outside leg seams are pressed open, with the selvage line visible each side, while the inside leg seams are overlocked, pressed to one side, and topstitched. As with the reversed yoke seam, rather than the standard direction of front leg over back leg I decided to flip the seam inlay the other way, so that from the outside, the back panel sits on top of the front panel. This was really just a hunch when I first tried it, but I’ve found that directed this way, the seam wears through less quickly at the crotch. The idea is that when sitting down (and especially when riding a bike), the seam edge is faced in the direction of natural travel, rather than having the folded edge rubbing as much.
Finally, the hems are double folded and sewn with a lock stitch machine. A lot is made of chainstitched hems, and I enjoy them as much as the next person, but I have a couple of issues with chainstitching, which I wanted to consider for Tender. Firstly, a chainstitch is fundamentally weaker than a lock stitch. A lock stitch machine (such as a standard domestic sewing machine) brings thread up and down through each stitch- from a reel at the top, and a smaller bobbin underneath. The reason chain stitching was developed was to make it possible to sew for much longer without needing to stop and change the bobbin, whose size is governed by the space under the sewing plate. Chainstitch machines don’t have an under thread at all, the just loop the top thread around itself on the reverse side of the fabric. This gives the characteristic ‘chain’ appearance on the inside of a hem, but if any part of the thread breaks, the entire thread can be pulled out with no resistance. Feed-of-the-arm machines, as for the seat and yoke seams, and waistband machines, also use chainstitches, but in these cases the practicality of the machine’s function outweighs its limitations (although this is also why the seat seam of Tender jeans is triple-stitched, to give an extra bulwark against any seam breaks). Perhaps more than this, though, a chainstitched hem feels like a tick-box, like selvage, for a certain level of jeans construction, which just didn’t feel all that relevant to Tender. Lock stitched hems can be altered at home or by a local tailor without specialist equipment, and without the owner being worried about changing the character of their hems. I have written about this elsewhere, I think, but as the wearer of a Tender garment is as important in its life as the designer or the machinist, then minutely unorthodox decisions in the service of making something adjustable at home, feels entirely appropriate.
This piece was originally written for the Tender Stores newsletter. If you would like to sign up for our occasional mailing list please
On Trade Shows
On Sense of Place
On Teaching
On Collaborating

On Shopkeeping

On Butterflies
On Spring / Summer 2024

On Pleats and Darts

On Colours

On Knitting with Two Yarns

On Autumn/Winter 2023

On Coffee Mugs and Understandable Construction

On Lost Jeans

On Construction-First Design

On Shirt Tails and Coat Tails

On Woven Stripes